

How to root Huawei y5 II CUN-L03 CUN-L21 CUN-L29 CUN-L23 Models
We will see how to root Huawei Y5 II CUN-L03, CUN-L21, CUN-L29, CUN-L23 models. We will go through all steps in order get root access on Huawei y5 II. First of all we will unlock the bootloader secondly we will install TWRP and at last flash SuperSU to root y5 II. An easy way to unlock bootloader and to root Huawei y5 II.
About Huawei y5 II
Huwaei y5 II comes with different models like CUN-L03, CUN-L21, CUN-L29, CUN-L23. Huwaei y5 II has Quad-core 1.3 GHz processor . 1 GB of RAM gives free hand to do multi-tasking without dropping down the performance of gadget. With Android version 6.0 marshmallow plus emotion UI v3.1. 8 MP Primary camera is made from the scratch resistant material and Front 2 MP camera provides pro features for classic selfies. 8 GB internal storage moreover SD card slot is available, support up to 128 GB. Huawei y5 II supports 3G and 4G LTE networks.
Before You Begin to Root Huawei Y5 II
- Disable Lock Screen & Security patterns.
- Diable antivirus on your smartphone if you have any.
- Follow the steps correctly otherwise you may brick your phone.
- This could void the warranty of your device. We won’t be held responsible for anything that happens from doing this tutorial so please proceed at your own risk.
- This method is tested on Huawei y5 II CUN-L03, CUN-L21, CUN-L29, CUN-L23 so you should only do this procedure on a Huawei y5 II otherwise it causes boot loop, you may soft brick your phone.
- You should backup the data before rooting the device just in case you want to apply a hard reset and return the device to the state that it was in before you started.
- Make sure your phone has at least 60-70% battery to prevent the accidental shutdown in-between the process.
Download Required Files
TWRP Recovery: Download
Steps to root Huawei Y5 II
- Unlock Bootloader.
- Install TWRP.
- Flash SuperSU.
How to Unlock Bootloader in Huawei Y5 II
Before Unlocking Bootloader, we are going through prerequisites steps:
- Install Fastboot, ADB and USB Drivers on your PC. See This.
- Enable Developer Options by going to Settings>About Phone and tapping on build number 7 times.
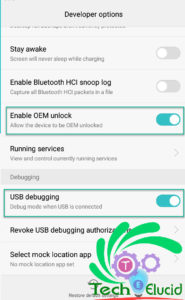
- Enable USB Debugging in Settings>Developer Options.
- Go to Settings>Developer Options and enable ‘OEM Unlocking.’
- Note down the IMEI number and serial number in Settings > About > Status.
- Dial *#*#1357946#*#* on your phone and note down the product ID.
Unlock Bootloader of Huawei Y5 II
- Go to Huawei Bootloader Unlock request page in order to do that you need to create an account on the Huawei Official site then login to your account.(register if you don’t have an account).
- Agree to the terms and conditions and click Next button.
- Now, Provide the required information about your device and click Submit button.
- If everything is right, you’ll get a unique 16-digit bootloader unlock password for your device.
Unlock Bootloader With Minimal ADB
Note: Make sure the USB Debugging and OEM are enabled.
- Now connect your Y5 II to the PC with a USB cable and Give required permission.
- Open “cmd-here.exe” from “C:\Program Files (x86)\Minimal ADB and Fastboot“.
- Boot your Huawei Mate 10 into bootloader mode with command or press volume down+power.
adb reboot bootloader
Note: If your device doesn’t boot into bootloader mode, then disable Fastboot function from your device’s Settings.
- Once your device is in bootloader mode, issue the following command to unlock the bootloader (Replace XXXX XXXX XXXX with your 16-digit bootloader unlock password).
fastboot OEM unlock xxxxxxxxxxxxx - The bootloader unlocking process will start automatically.Once the process is finished, your device will reboot.
- That’s it; you have successfully unlocked BootLoader of Huawei Y5 II.
How to Install TWRP Huawei Y5 II
- Requirements to install custom recovery
- Unlocked bootloader.
- Enable OEM unlock (go to settings -> developer options -> enable OEM unlock).
- If developer Options are hidden:
Goto settings -> About Phone and tap Build Number 7 times.
Steps To Install TWRP Y5 II :
- Download TWRP (if you already haven’t).
- Rename file to “twrp.img” and copy to ADB folder (C:\Program Files (x86)\Minimal ADB).
- Connect your phone to PC an type following command in CMD window (to open cmd type “cmd” in the address bar of file explorer and press enter in ADB folder) it will show connected devices.
adb devices
- Now boot the device into fastboot mode by press and hold Volume Down + power keys or type following command.
adb reboot bootloader
- Now type the following command in fastboot mode to flash TWRP.
fastboot flash recovery twrp.img
- Once done, you have successfully installed Custom recovery (TWRP) on Huawei p10 lite. Now type this command to reboot the phone.
fastboot reboot
- when the phone starts normally type the following command to boot into recovery mode:
adb reboot recovery
How to Install SuperSU on Huaweii y5 II
- Download SuperSU: Downlaod
- Copy zip file to your SD card.
- Reboot to recovery press and hold Volume Up + Power or type command in CMD ( Phone should b connected).
adb reboot recovery
- After booting into TWRP “Swipe to allow modifications“.
- Then Click Install and locate zip file.
- Check Reboot after Install and swipe again (It will take some time to install).
- Done, Huawei Y5 II is rooted now.
You might be interested in:
- Best Root Apps for Android Phones.
- How To Root Huawei Honor 8 Lite – PRA-LA1 PRA-TL10
- Root Huawei y6 II CAM-L21 – Install TWRP + SuperSU
- How To Root Huawei P10 Lite – WAS-LX1, WAS-LX2, WAS-LX2J, WAS-LX3, WAS-L03T
Last Words about rooting Huawei y5 II.
Before using any third-party app to gain root access make sure it is reliable for you. You can install any root checker application to check root access, after that open SuperSU app in your app drawer to grant root permissions for apps and services on your device.There are tons of apps which can be used after gaining root access so make sure you try best from them, I hope this will increase your productivity. Your suggestions are most welcome.


