Home Blog Page 2

How to Hide WhatsApp Profile Picture and Status from Specific Contacts

How to Hide WhatsApp Profile Picture and Status from Specific Contacts

Social profile stalkers exists in everyone’s contact list,  it’s a simple truth you can’t ignore that fact. You will always need to stay private from some people for several reasons.In WhatsApp latest features, WhatsApp user can share photos, videos, and GIF with their contacts as a daily status update all status updates photos, videos and GIF’s last only for about 24 hours, before disappearing automatically. By default, this status updates are set to be public which means can be seen by all contacts but this can disturb privacy of some users who do not like to share their daily status with everyone in their Contact List or address book so for that Fortunately, WhatsApp makes it easier to set  your status updates and profile picture to hide status from specific contacts or to share your status only with specific contacts.

In case you don’t know how to hide your Profile Picture and status from one person we will help you with that.

Note: All methods are no-root methods, however, there are many methods available for rooted devices. So for the sake of the non-rooted users, we are explaining normal methods.

How to Hide WhatsApp Profile Picture from specific contacts

You can easily restrict someone from seeing your WhatsApp profile picture in three ways:

  1. Restrict WhatsApp Profile Picture to Address Book Contacts only
  2. Remove Contacts From Address Book who should not be seeing your Profile Picture
  3. Use third party App WhatsNot.

First, two methods don’t require any third party software or any app. You just need to follow steps and you are done. So without wasting any time, let’s start.


Recommended for You:


Restrict WhatsApp Profile Picture to Contacts Only

As you know there is no official way by Whatsapp to hide your Profile Picture from selected contacts in WhatsApp. So, we will use other tricks to hide WhatsApp profile picture from specific contacts.

  • First Open WhatsApp on your Android Phone.
  • Then tap on the 3-dots icon located at the top right corner of your Android Phone and then tap on Settings in the drop-down menu.
  • Navigate to the Settings screen, tap on the Account option.
  • On the Account Screen, tap on Privacy.
  • Then On the Privacy screen, tap on Profile Photo.
  • On the next screen, tap on My Contacts.

Delete Contacts From Address Book of Phone

Now, the next trick we are going to use is to make sure that the contacts that you want to hide WhatsApp Profile Picture from are not listed in the Address book of your Android Phone. Keep in kind that Even if you delete the Contacts from the Address book, your Chats with these Contacts will still remain active. The main change you will notice a change in the way these Contacts will be appearing in WhatsApp, You will no longer see the Names of Contacts that you have removed from the address book, you will only see their phone numbers. If you are Ok with how these Contacts appear in WhatsApp, you can go ahead and delete these contacts from address book.Please make a backup of contacts for future use.

Delete Contacts From Address Book on Android Phone

Follow the steps below to delete certain Contacts from the address book on your Android Phone.

  • Open the Contacts App on your Android Phone.
  • Tap on the Contact that you want to delete.
  • On the next screen, tap on the 3-dots icon located at the top right corner of your screen and then tap on the Delete option in the menu that appears.

Once you remove Contacts from the Address book, they will no longer be able to see your WhatsApp Profile Picture.

Block Someone from Seeing your WhatsApp picture with ” WhatsNot “

Here is a simpler one involving a third-party application. You can use it without rooting your phone and it is completely free.

How “WhatsNot” works

I have personly used WhatsNot  and it literally eliminates the contact from phone’s memory and makes you able to call and text them from it only. In reality, it only tricks WhatsApp that the contact is not in phone memory. As a result, you can receive the messages from them but others won’t gonna see your WhatsApp profile picture and status updates. Moreover, remember one thing that some users have reported that it hadn’t worked for them.

  • First go to Play store, search for “WhatsNot” and install it.
  • Then Open it and search for the contact from which you wanna hide your  WhatsApp profile picture and status updates.
  • That is it you are done.

Regardless of following any of above methods, you will still be able to send and receive messages from those contacts but they will not be able to see your profile picture or status updates.

Conclusion:

We hope that you were able to hide certain people from viewing your WhatsApp Profile picture and status updates with these easy methods. In case of any difficulties please comment below.


How to Root Huawei Y7 – Y7 Prime – TRT-AL00, TRT-AL00A, TRT-TL10, TRT-TL10A, TRT-L21A

How to Root huawei Y7 - Y7 Prime - TRT-AL00, TRT-AL00A, TRT-TL10, TRT-TL10A, TRT-L21A

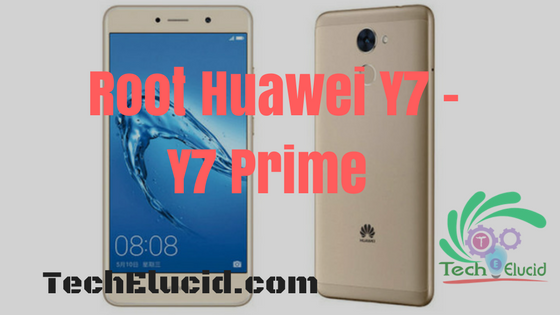
In this article, you Will Learn How to Install TWRP Recovery on Huawei Y7 – Huawei Y7 Prime and Root Huawei Y7. We will be seeing to root Huawei Y7 – Y7 Prime variants TRT-AL00, TRT-AL00A, TRT-TL10, TRT-TL10A, and TRT-L21A. See How to root Huawei Y7 – Huawei Y7 Prime with simple and easy steps. To root, First of all, we will unlock the bootloader secondly we will install TWRP and at last flash, SuperSU to root Huawei Y7 – Y7 Prime. Rooting is the way to obtain Right’s on Android Devices, that means after Rooting the Phone You can unlock All features of the Device and you have Full Permission to Play with it. Rooting also the Best way to Save battery because after Root access you can disable system apps easily. After root, you can Modify system Apps and Setting. Follow Guide to Install TWRP Recovery and Root Huawei Y7

Root Huawei Y7 – Y7 Prime

To Root Huawei Y7 – Y7 Prime.  Huawei y7 is variant of Enjoy 7 Plus that was launched earlier by Huawei earlier and now to make it available worldwide Huawei Y7 Prime is launched.Huawei Y7 prime will come with 4000 mAh sealed and a massive battery. Huawei Y7 Prime’s display screen is equipped with IPS panel. Equipped with Snapdragon 435 chipset which is accompanied with octa-core processor and Adreno 505 GPU for heavy graphics. A fingerprint sensor is available on the back side just below the main camera and it unlocking speed is just 0.3 seconds. Even with many apps running simultaneously, the user experience is always smooth due to 3GB RAM installed. Huawei Y7 and Y7 prime come in variants TRT-AL00, TRT-AL00A, TRT-TL10, TRT-TL10A, TRT-L21A. So let’s get started but before that see precautions below.

Precautions Before Root Huawei Y7 – Y7 Prime

  • You should backup the data before rooting the device just in case you want to apply a hard reset and return the device to the state that it was in before you started.
  • Follow the steps correctly otherwise you may brick your phone.
  • If you have HiSuite installed on your PC. Then turn it off – make sure it does not run in the background.
  • Disable Lock Screen & Security patterns.
  • Disable antivirus on your smartphone if you have any.
  • This could void the warranty on your device. We won’t be held responsible for anything that happens from doing this tutorial so please proceed at your own risk.
  • Make sure your phone has at least 70-80% battery to prevent the accidental shutdown in-between the process.

See Also our recommended reading:


Prerequisites

  • Download TWRP here for Huawei Y7 Prime
  • Download Super SU from here
  • Minimal ADB and Fastboot.
  • OEM unlocking in the developer options should be active.
  • Huawei HiSuite (installs all necessary drivers).

How To Root Huawei Y7 Prime

We are going too complete with all steps but first, make sure you enable all these settings.

Steps to root  Huawei Y7 Prime

  1. Turn On USB debugging and OEM unlock.
  2. Unlock Bootloader.
  3. Install TWRP.
  4. Flash(Install) SuperSU from SD-card.

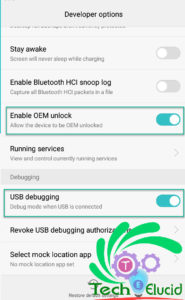
How to Turn On USB debugging and OEM unlock in Huawei Y7-Y7 Prime.

  • On your Huawei Y7 or Huawei Y7 Prime.
  • Go to Settings -> About.
  • Tap on Build Number seven times.
  • Go to Developer Options.
  • Check Enable OEM Unlock.
  • Check USB Debugging.

How to Unlock Bootloader in Huawei Y7 – Y7 Prime

A locked bootloader is one that will only boot operating system Android in our case which means that device’s boot partition will only launch Android OS on your phone, No matter what happens user can’t alter it. In case of devices with a locked bootloader, it is not possible to do custom operations like booting a Custom operating System.It requires the owner to first unlock the bootloader.

To Unlock Bootloader on Huawei Y7 – Y7 Prime

We have split the instructions into two steps. The first step involves Installing necessary drivers Like USB, Fastboot, and ADB to make the connection with your phone’s hardware.The second step will guide you on how to unlock the bootloader on Huawei Y7 – Huawei Y7 Prime using fastboot commands.

  • Install Fastboot, ADB and USB Drivers on your PC.
  • Note down the IMEI number and serial number in Settings > About > Status.
  • Dial *#*#1357946#*#* on your phone and note down the product ID.

Unlock Bootloader of Huawei Y7 – Y7 Prime

  • Go to Huawei Bootloader Unlock request page in order to do that you need to create an account on the Huawei Official site then login to your account.(register if you don’t have an account).
  • Agree to the terms and conditions and click Next button.
  • Now, Provide the required information about your device and click Submit button.
  • If everything is right, you’ll get a unique 16-digit bootloader unlock password for your device.

Unlock Bootloader With Minimal ADB on Huawei Y7 – Y7 Prime

  • Note: Make sure the USB Debugging and OEM are enabled.
  • Now connect your Huawei Y7 – Y7 Prime to the PC with a USB cable and grant required permissions.
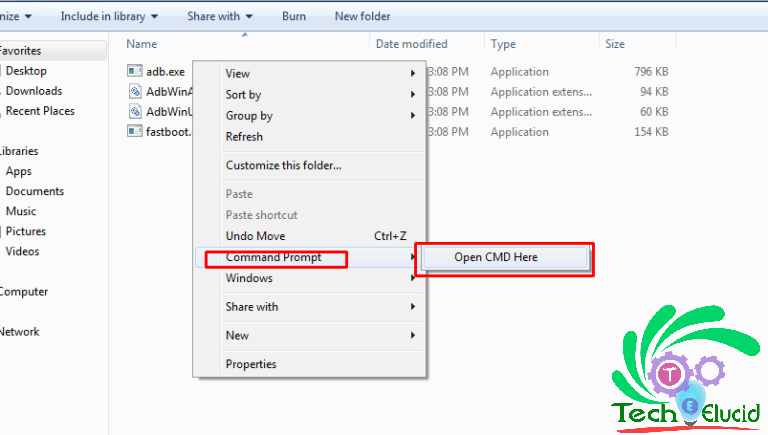
  • Navigate to the directory where Minimal ADB is installed and open “cmd-here.exe” from “C:\Program Files (x86)\Minimal ADB and Fastboot“.How to Root Huawei Honor 7x - BND-L21, BND-L22, BND-L24 , BND-AL10, BND-TL10
    Then Boot Huawei Y7 – Y7 Prime into bootloader mode with the below command or press volume down+power.

ADB REBOOT BOOTLOADER

  • Note: If your device doesn’t boot into bootloader mode, then disable Fastboot function from your device’s Settings.
  • Once your device is in bootloader mode, issue the following command to unlock the bootloader (Replace XXXX XXXX XXXX with your 16-digit bootloader unlock password).

fastboot OEM unlock  xxxxxxxxxxxxx

  • The bootloader unlocking process will start automatically.Once the process is finished, your device will reboot.
  • That’s it; you have successfully unlocked BootLoader of Huawei Y7 – Huawei Y7 Prime.

If anything goes wrong or confusing to you see the detailed guide on How to Unlock Bootloader on Huawei Phones.


How to Root Huawei Honor 7x – BND-L21, BND-L22, BND-L24 , BND-AL10, BND-TL10

See How to root Huawei honor 7x with all steps. An easy step by step tutorial to root Huawei Honor 7X.First of all, we will unlock the bootloader secondly we will install TWRP and at last flash SuperSU to root Huawei 7x. After root, you can install custom Rom, App, and Setting.We will be seeing to root Huawei honor 7x BND-L21, BND-L22, BND-L24, or BND-AL10, BND-TL10 variants.

Root Huawei Honor 7x

When it comes to performance we try our best to get full results using an android phone but without root is really like a tasteless dish.To Root Huawei, honor 7x is everything about changing the default. Yes, by adding personal customizations so you can choose how to tweak the Android Operating System in order to increase speed, upgrade battery life and change the default functionality, remove custom apps and change the theme. Well, in our case this can be obtained through a single process which is gaining root access on your Honor 7x.

To Root Huawei Honor 7x is going to be a fun because Huawei revealed Huawei Honor 7X this month, With a high screen-to-body ratio and 2160 x 1080 FHD+ resolution, the Honor FullView display on the Honor 7X brings you an extraordinary, immersive visual experience. With the 4GB RAM, 2.36GHz Octa-core Kirin 659, and EMUI5.1 an ideal phone for multitasking.Huawei Honor 7x Comes with varients BND-L21 (Europe), BND-L22(India), BND-L24 (USA), BND-AL10, BND-TL10 (China). Even with many apps running simultaneously, the user experience is always smooth.The most astonishing feature is One-key Screen Split which offers an even faster multi-management expertise. So let’s get started but before that see instructions below.

Precautions Before Root Huawei honor 7X

  • Disable Lock Screen & Security patterns.
  • Disable antivirus on your smartphone if you have any.
  • Follow the steps correctly otherwise you may brick your phone.
  • If you have HiSuite installed on your PC. Then turn it off – make sure it does not run in the background.
  • This could void the warranty on your device. We won’t be held responsible for anything that happens from doing this tutorial so please proceed at your own risk.
  • You should backup the data before rooting the device just in case you want to apply a hard reset and return the device to the state that it was in before you started.
  • Make sure your phone has at least 60-70% battery to prevent the accidental shutdown in-between the process.
  • Currently Works only on Huawei Honor 7x BND-L21 and TL10/AL10 (further variants’ TWRP will be posted soon.

Required Things: Download TWRP and SuperSU for Huawei honor 7x

  • Get the Honor 7X TWRP here.
  • Get Super SU here.
  • PC with Windows 7 / 8.1 / 10.
  • USB cable.
  • Minimal ADB and Fastboot.
  • OEM unlocking in the developer options active.
  • Huawei HiSuite (installs all necessary drivers).

To Root Huawei Honor 7x

We are going too complete with all steps but first, make sure you enable all these settings.

Steps to root Huawei Honor 7x

  1. Turn On USB debugging and OEM unlock.
  2. Unlock Bootloader.
  3. Install TWRP.
  4. Flash SuperSU.

Turn On USB debugging and OEM unlock.

  • On your Honor 7X.
  • Go to Settings -> About.
  • Tap on Build Number seven times.
  • Go to Developer Options.
  • Check Enable OEM Unlock.
  • Check USB Debugging.

How to Unlock Bootloader in Huawei Honor 7x

A locked bootloader is one that will only boot operating system Android in our case which means that device’s boot partition will only launch Android OS on your phone, No matter what happens user can’t alter it. In case of devices with a locked bootloader, it is not possible to do custom operations like booting a Custom operating System.It requires the owner to first unlock the bootloader.

Instructions to Unlock Bootloader on Honor 7X

We have split the instructions into two steps. The first step involves Installing necessary drivers Like USB, Fastboot, and ADB to make the connection with your phone’s hardware.The second step will guide you on how to unlock the bootloader on Honor 7X using fastboot commands.

  • Install Fastboot, ADB and USB Drivers on your PC.
  • Note down the IMEI number and serial number in Settings > About > Status.
  • Dial *#*#1357946#*#* on your phone and note down the product ID.

Unlock Bootloader of Huawei Honor 7x

  • Go to Huawei Bootloader Unlock request page in order to do that you need to create an account on the Huawei Official site then login to your account.(register if you don’t have an account).
  • Agree to the terms and conditions and click Next button.
  • Now, Provide the required information about your device and click Submit button.
  • If everything is right, you’ll get a unique 16-digit bootloader unlock password for your device.

Unlock Bootloader With Minimal ADB

  • Note: Make sure the USB Debugging and OEM are enabled.
  • Now connect your Huawei Honor 7x to the PC with a USB cable and Give required permission.
  • Open “cmd-here.exe” from “C:\Program Files (x86)\Minimal ADB and Fastboot“.How to Root Huawei Honor 7x - BND-L21, BND-L22, BND-L24 , BND-AL10, BND-TL10
    Boot your Huawei Honor 7x into bootloader mode with command or press volume down+power.

ADB REBOOT BOOTLOADER

  • Note: If your device doesn’t boot into bootloader mode, then disable Fastboot function from your device’s Settings.
  • Once your device is in bootloader mode, issue the following command to unlock the bootloader (Replace XXXX XXXX XXXX with your 16-digit bootloader unlock password).

fastboot OEM unlock  xxxxxxxxxxxxx

  • The bootloader unlocking process will start automatically.Once the process is finished, your device will reboot.
  • That’s it; you have successfully unlocked BootLoader of Huawei Honor 7x.

If anything goes wrong or confusing to you see: How to Unlock Bootloader on Huawei Phones 


How to Replace Kingroot with SuperSU – Replace Kinguser with SuperSu – Remove Kingroot

How to Replace Kingroot with SuperSU - Replace Kinguser with SuperSu - Remove Kingroot

Getting root access on your Android phone is quite easy in some cases when you use third-party apps instead of professional method e.g with custom recovery and flashing SuperSu manually in ROM. In rooting business Kingroot’s Kinguser and SuperSu are used most widely.As apps like Kingroot have the simple and easy procedure so 60 % people go with Kingroot, Framaroot and Vroot like apps. Later on, people find out about limited functionality of Kingroot (Kinguser). As a result, most users are looking forward to making complete use of your rooted android device by replacing Kingroot with SuperSu.Luckily SuperSu is the only app with enhanced features, in free so SuperSu is your way out of that issue. So In this guide, I will show how to replace Kingroot with SuperSU. There are many methods to replace Kingroot and I will be explaining the most used and easy methods. So, Let’s get started.

Kingroot Vs SuperSu | KingUser vs SuperSu

  • With Kingroot you can root your phone with just one tap without installing any custom recovery like TWRP. While you have to follow the long procedure in order to flash SuperSu into phone’s ROM.
  • Kingroot will give you access to the system and it will take over the system. While SuperSU will give you access to the system but not take over the system.
  • If you got Kingroot It ill display of ads of other apps if you mistakenly install any of another app it may harm your Phone. While there is no such thing in SuperSU.
  • Those installed apps may consume your data connection to download extra content like bold icons on app drawer etc. As a result, this can affect your bandwidth and battery. While there is no such thing in SuperSU.
  • Sometimes it is very difficult to override Kingroot’s procedure to remove Kingroot. While SuperSu is easy to remove.

Neutral case with Kingroot and SuperSU

Some mobile phone requires bootloader unlocking to flash a custom recovery like Huawei and LG.Smartphones, especially on Qualcomm Snapdragon chipset, require bootloader unlocking. So to root your phone with Kingroot or Custom Recovery You have to unlock Bootloader in both cases.

1st Method – Replace Kingroot with SuperSU From Playstore – Remove Kingroot

The simple and easy method is to replace install SuperSu from Playstore and then grant permissions.Follow the steps listed below to remove KingRoot’s KingUser and replace it with SuperSU is no time.

Note: If for any reason this method does not works go for the method 2.

Steps to Replace Kingroot with SuperSU

  • First of all Open PlayStore.
  • Install SuperSU (SuperSU officially only)
  • Give it permission as a SuperUser (allow it as SuperUser.
  • Then Simply Uninstall KingRoot.
  • Update SuperUser Binary and Restart the device.
  • That’s it if every done is right you’ve replaced your KingUser with SuperSU successfully.

2nd Method – Replace Kinguser with SuperSU – Replace Kingroot with SuperSu

  • Download SuperMe App from here.
  • Extract the zip file into internal storage.
  • Install on your Phone, Like any other normal app
  • Now, after successful Install, simply open it,  It will prompt for root permissions, click on Grant button, to give superuser permissions in order to replace Kingroot.
  • Then, it will show a black screen with blue icon press the blue icon
  • Replacement process will start, it will take about 1-2 minutes to complete the process, depending on your phone’s performance.
  • Then, it will Automatically Launch Supersu app or manually open SuperSu from App Drawer.
  • After the process is finished if there are Kingroot icons remaining simply drag them to uninstall.

How to Replace Kingroot with SuperSU - Replace Kinguser with SuperSu - Remove Kingroot

3rd Method – Remove KingRoot’s KingUser using Terminal – Replace Kinguser with SuperSU

Last But not final this method works for almost all the Android smartphones when we want to replace Kinguser with SuperSu. However, it requires some light technical skills to follow the instructions. which I hope you can do easily you just have to copy the commands listed below into the Android Terminal.


Downloads 

First of all download essential things, you will require completing the below steps.

  1. First of all download and Install Terminal Emulator for Android.
  2. Download SuperSu.zip file.

Steps to Replace Kinguser with SuperSU – Remove Kingroot

  • Extract the ZIP-File & Transfer the extracted version to Internal storage of the device.
  • Move the extracted file to the outermost directory in the internal storage like SD\.
  • Then start Terminal Android App and type the Following commands in the Terminal.

su

  • Then you will be prompted with the message asking you to deny/ grant, select grant
  • After giving permission type following command.

sh /sdcard/mrw/root.sh

  • After that, it might show some error, but ignore it, either SuperSu will automatically launch or manually open SuperSu.
  • Once done, Restart your smartphone.That’s all, you’ve successfully replaced KingRoot’s KingUser with Chainfire’s SuperSU.

Last Words on SuperSu & Kingroot

No one can give priority to Kingroot’s Kinguser when there is Chainfire’s SuperSu, I would recommend keeping SuperSu your first priority because it is a very handful tool in every way. Feel free to give your suggestions in the comment section.

How to Root Huawei Y5 II CUN-L03 CUN-L21 CUN-L29 CUN-L23 – Install TWRP Y5 II

How to Root Huawei Y5 II CUN-L03 CUN-L21 CUN-L29 CUN-L23 – Install TWRP Y5 II

How to root Huawei y5 II CUN-L03 CUN-L21 CUN-L29 CUN-L23 Models

We will see how to root Huawei Y5 II CUN-L03, CUN-L21, CUN-L29, CUN-L23 models. We will go through all steps in order get root access on Huawei y5 II. First of all we will unlock the bootloader secondly we will install TWRP and at last flash SuperSU to root y5 II. An easy way to unlock bootloader and to root Huawei y5 II.

About Huawei y5 II

Huwaei y5 II comes with different models like CUN-L03, CUN-L21, CUN-L29, CUN-L23. Huwaei y5 II has Quad-core 1.3 GHz processor . 1 GB of RAM gives free hand to do multi-tasking without dropping down the performance of gadget. With Android version 6.0 marshmallow plus emotion UI v3.1. 8 MP Primary camera is made from the scratch resistant material and Front 2 MP camera provides pro features for classic selfies. 8 GB internal storage moreover SD card slot is available, support up to 128 GB. Huawei y5 II supports 3G and 4G LTE networks.

Before You Begin to Root Huawei Y5 II

  • Disable Lock Screen & Security patterns.
  • Diable antivirus on your smartphone if you have any.
  • Follow the steps correctly otherwise you may brick your phone.
  • This could void the warranty of your device. We won’t be held responsible for anything that happens from doing this tutorial so please proceed at your own risk.
  • This method is tested on Huawei y5 II CUN-L03, CUN-L21, CUN-L29, CUN-L23 so you should only do this procedure on a Huawei y5 II otherwise it causes boot loop, you may soft brick your phone.
  • You should backup the data before rooting the device just in case you want to apply a hard reset and return the device to the state that it was in before you started.
  • Make sure your phone has at least 60-70% battery to prevent the accidental shutdown in-between the process.

Download Required Files 

TWRP Recovery: Download

Steps to root Huawei Y5 II

  1. Unlock Bootloader.
  2. Install TWRP.
  3. Flash SuperSU.

How to Unlock Bootloader in Huawei Y5 II

Before Unlocking Bootloader, we are going through prerequisites steps:

  • Install Fastboot, ADB and USB Drivers on your PC. See This.
  • Enable Developer Options by going to Settings>About Phone and tapping on build number 7 times.
  • Enable USB Debugging in Settings>Developer Options.
  • Go to Settings>Developer Options and enable ‘OEM Unlocking.’
  • Note down the IMEI number and serial number in Settings > About > Status.
  • Dial *#*#1357946#*#* on your phone and note down the product ID.

Unlock Bootloader of Huawei Y5 II

  • Go to Huawei Bootloader Unlock request page in order to do that you need to create an account on the Huawei Official site then login to your account.(register if you don’t have an account).
  • Agree to the terms and conditions and click Next button.
  • Now, Provide the required information about your device and click Submit button.
  • If everything is right, you’ll get a unique 16-digit bootloader unlock password for your device.


Unlock Bootloader With Minimal ADB

Note: Make sure the USB Debugging and OEM are enabled.

  • Now connect your Y5 II to the PC with a USB cable and Give required permission.
  • Open “cmd-here.exe” from “C:\Program Files (x86)\Minimal ADB and Fastboot“.
  • Boot your Huawei Mate 10 into bootloader mode with command or press volume down+power.

    adb reboot bootloader

    Note: If your device doesn’t boot into bootloader mode, then disable Fastboot function from your device’s Settings.

  • Once your device is in bootloader mode, issue the following command to unlock the bootloader (Replace XXXX XXXX XXXX with your 16-digit bootloader unlock password).
    fastboot OEM unlock  xxxxxxxxxxxxx
  • The bootloader unlocking process will start automatically.Once the process is finished, your device will reboot.
  • That’s it; you have successfully unlocked BootLoader of Huawei Y5 II.

How to Install TWRP Huawei Y5 II

  • Requirements to install custom recovery
  1. Unlocked bootloader.
  2. Enable OEM unlock (go to settings -> developer options -> enable OEM unlock).
  • If developer Options are hidden:

Goto settings -> About Phone and tap Build Number 7 times.

Root Huawei Y5 II CUN-L03 CUN-L21 CUN-L29 CUN-L23 - Install TWRP SuperSu

Steps To Install TWRP Y5 II :

  • Download TWRP (if you already haven’t).
  • Rename file to “twrp.img” and copy to ADB folder (C:\Program Files (x86)\Minimal ADB).
  • Connect your phone to PC an type following command in CMD window (to open cmd type “cmd” in the address bar of file explorer and press enter in ADB folder) it will show connected devices.

adb devices

  • Now boot the device into fastboot mode by press and hold Volume Down + power keys or type following command.

adb reboot bootloader

  • Now type the following command in fastboot mode to flash TWRP.

fastboot flash recovery twrp.img

  • Once done, you have successfully installed Custom recovery (TWRP) on Huawei p10 lite. Now type this command to reboot the phone.

fastboot reboot

  • when the phone starts normally type the following command to boot into recovery mode:

adb reboot recovery

How to Install SuperSU on Huaweii y5 II

  • Download SuperSU: Downlaod 
  • Copy zip file to your SD card.
  • Reboot to recovery press and hold Volume Up + Power or type command in CMD ( Phone should b connected).

adb reboot recovery

  • After booting into TWRP “Swipe to allow modifications“.
  • Then Click Install and locate zip file.
  • Check Reboot after Install and swipe again (It will take some time to install).
  • Done, Huawei Y5 II is rooted now.

You might be interested in:


Last Words about rooting Huawei y5 II.

Before using any third-party app to gain root access make sure it is reliable for you. You can install any root checker application to check root access, after that open SuperSU app in your app drawer to grant root permissions for apps and services on your device.There are tons of apps which can be used after gaining root access so make sure you try best from them, I hope this will increase your productivity. Your suggestions are most welcome.


Top Picks

How to Install TWRP on Galaxy S9 - Install Custom Recovery on Galaxy S9

How to Install TWRP on Galaxy S9 – Install Custom Recovery on Galaxy S9

To Explore all options in your Samsung Galaxy s9 is only possible if you got root access like basic tweaking processes such as replacing...
How to Hide WhatsApp Profile Picture and Status from Specific Contacts

How to Hide WhatsApp Profile Picture and Status from Specific Contacts

Social profile stalkers exists in everyone’s contact list,  it's a simple truth you can’t ignore that fact. You will always need to stay private...
How to Root huawei Y7 - Y7 Prime - TRT-AL00, TRT-AL00A, TRT-TL10, TRT-TL10A, TRT-L21A

How to Root Huawei Y7 – Y7 Prime – TRT-AL00, TRT-AL00A, TRT-TL10, TRT-TL10A, TRT-L21A

In this article, you Will Learn How to Install TWRP Recovery on Huawei Y7 - Huawei Y7 Prime and Root Huawei Y7. We will be...
How to Replace Kingroot with SuperSU - Replace Kinguser with SuperSu - Remove Kingroot

How to Replace Kingroot with SuperSU – Replace Kinguser with SuperSu – Remove Kingroot

Getting root access on your Android phone is quite easy in some cases when you use third-party apps instead of professional method e.g with...
How to Root Huawei Mate 9 MHA-L29 MHA-L09 MHA-AL00 L0N-L29 TWRP SuperSU

How to Root Huawei Mate 9 MHA-L29 MHA-L09 MHA-AL00 L0N-L29 TWRP SuperSU

In this guide, you’ll see how to root Huawei Mate 9 MHA-L29, MHA-L09, MHA-AL00, L0N-L29 and install TWRP recovery with official Android 7.0 firmware.To...
How to Install ADB Fastboot and USB Drivers on Windows for Huawei Phones

How to Install ADB Fastboot and USB Drivers on Windows for Huawei Phones –...

In this guide, we are going to see How to Install ADB Fastboot and USB Drivers on Windows for Huawei Phones without downloading full Android...
How To Root Huawei P10 Lite - WAS-LX1, WAS-LX1A, WAS-LX2, WAS-LX2J, WAS-LX3 

How To Root Huawei P10 Lite – WAS-LX1, WAS-LX2, WAS-LX2J, WAS-LX3, WAS-L03T

Root Huawei P10 lite Huawei P10 Lite smartphone comes with a 5.20-inch touchscreen display with a resolution of 1080 pixels by 1920 pixels.Huawei P10 Lite...